The direction in which you lay rectangular tiles can dramatically transform your space. While horizontal layouts have long been the traditional choice, vertically laid rectangular tiles are gaining popularity for their ability to create striking visual effects and solve specific design challenges. This comprehensive guide will help you decide if vertical tile orientation is the right choice for your next renovation project, exploring everything from aesthetic benefits to practical installation considerations.
The Visual Impact of Vertical vs. Horizontal Tile Layouts
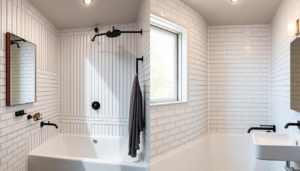
The same space with vertical (left) and horizontal (right) tile layouts shows dramatically different visual effects
Before diving into the specifics, it’s important to understand how tile orientation affects spatial perception. The direction of your tile layout creates visual lines that guide the eye and can completely transform how a room feels, regardless of its actual dimensions.
How Vertical Layouts Affect Space
When rectangular tiles are laid vertically, they create strong upward lines that draw the eye from floor to ceiling. This vertical movement has several effects on spatial perception:
- Creates an illusion of greater height
- Makes ceilings appear higher than they actually are
- Adds a sense of grandeur to smaller spaces
- Provides a more contemporary, unexpected look
Vertical tile arrangements are particularly effective in rooms with low ceilings or in spaces that feel compressed. The upward visual flow helps counteract that heaviness, making the room feel more open and airy.
How Horizontal Layouts Affect Space
In contrast, horizontally laid rectangular tiles create side-to-side movement that affects the space differently:
- Makes rooms appear wider and more expansive
- Creates a sense of continuity across walls
- Provides a more traditional, classic appearance
- Can make a space feel more grounded and stable
Horizontal layouts have been the conventional choice for decades, particularly in traditional design schemes. They work well in narrow spaces where creating a sense of width is the priority.
Pros and Cons of Vertically Laid Rectangular Tiles
Like any design choice, vertical tile layouts come with distinct advantages and potential drawbacks. Understanding these can help you make an informed decision for your specific space and needs.
Advantages of Vertical Tile Layouts
- Height Enhancement: Creates the illusion of taller ceilings and more spacious rooms
- Modern Aesthetic: Offers a contemporary look that stands out from traditional horizontal layouts
- Architectural Interest: Adds visual drama and unexpected design elements
- Complementary to Tall Features: Works well alongside vertical elements like shower columns or tall cabinets
- Space Definition: Helps define and separate areas in open-concept spaces
- Shower-Friendly: Vertical grout lines allow for better water drainage in shower installations
Disadvantages of Vertical Tile Layouts
- Installation Complexity: Often requires more precise cutting and alignment
- Material Waste: May result in more tile waste during installation
- Higher Labor Costs: Can be more time-consuming to install, increasing labor expenses
- Visual Narrowing: May make already narrow rooms feel even tighter
- Maintenance Challenges: Vertical grout lines can show dirt and stains more visibly
- Trend Risk: As a more contemporary choice, it may eventually date more quickly than classic horizontal layouts

Vertical tile layout in this bathroom creates a striking sense of height despite the modest ceiling
Best Spaces for Vertically Laid Rectangular Tiles
While vertical tile layouts can work in many areas, they’re particularly effective in certain spaces where their height-enhancing properties can be maximized.
Bathrooms

Bathrooms, especially smaller ones, benefit tremendously from vertical tile layouts. The upward visual movement makes compact bathrooms feel more spacious and luxurious. Vertical tiles are particularly effective in:
- Shower enclosures
- Behind vanities
- On accent walls
The vertical orientation also helps with water drainage in shower areas, making it both a practical and aesthetic choice.
Kitchens

Kitchen backsplashes offer perfect opportunities for vertical tile arrangements. This unexpected orientation can make standard kitchens feel custom and high-end. Vertical layouts work especially well:
- Behind ranges or cooktops
- In galley kitchens
- In spaces with tall cabinets
The vertical lines can also help visually connect countertops to upper cabinets, creating a more cohesive look.
Entryways & Hallways

Entryways and hallways often suffer from limited dimensions. Vertical tile layouts can transform these transitional spaces by:
- Making narrow passages feel less confined
- Creating dramatic first impressions
- Establishing visual interest in otherwise plain areas
Even partial wall applications, such as vertical wainscoting, can significantly enhance these often-overlooked spaces.
Design Considerations for Vertical Tile Layouts
Beyond simply turning your tiles 90 degrees, there are several important design factors to consider when planning a vertical tile installation.
Tile Size and Proportions

Different tile sizes create dramatically different effects when laid vertically
The dimensions of your rectangular tiles significantly impact the final look of a vertical installation:
| Tile Size | Visual Effect When Vertical | Best Applications |
| Standard Subway (3″×6″) | Subtle height enhancement, classic with a twist | Traditional spaces needing modest height boost |
| Elongated Subway (2″×8″ or 4″×12″) | Dramatic height enhancement, contemporary look | Modern spaces, areas needing significant visual stretching |
| Large Format (6″×24″ or 8″×48″) | Bold architectural statement, minimal grout lines | Contemporary designs, shower walls, feature walls |
| Mini Subway (2″×4″) | Textured, detailed appearance with many grout lines | Accent areas, vintage-inspired spaces |
Grout Color and Width
Grout choices become even more important with vertical layouts, as they create strong visual lines that draw the eye upward:
Contrasting Grout
Dark grout against light tiles (or vice versa) will:
- Emphasize the vertical pattern dramatically
- Create bold, graphic lines that command attention
- Work well in contemporary or industrial-inspired spaces
- Hide stains better in high-traffic or wet areas
Matching Grout
Grout that closely matches the tile color will:
- Create a more subtle, seamless appearance
- Allow the vertical effect to be present but not dominant
- Work well in spaces where other elements should be focal points
- Create a more expansive, less busy visual effect

The same vertical tile layout with matching grout (left) versus contrasting grout (right)
Pattern Variations
Vertical layouts aren’t limited to simple stacked arrangements. Consider these pattern variations to add further visual interest:
Vertical Stack

The simplest vertical arrangement with tiles stacked directly on top of each other, creating clean, uninterrupted vertical lines.
Vertical Offset/Running Bond

Similar to traditional brick patterns but turned 90 degrees, with each row offset by half a tile (or another fraction).
Vertical Herringbone

A traditional herringbone pattern rotated to emphasize vertical movement while maintaining the distinctive zigzag effect.
Installation Guide for Vertically Laid Rectangular Tiles
Installing tiles vertically requires careful planning and execution to achieve professional results. Here’s what you need to know before starting your project.
Surface Preparation
Proper surface preparation is even more critical for vertical layouts, as any imperfections will be emphasized by the strong directional lines:
- Ensure walls are perfectly plumb – Use a level to check that walls are straight vertically. Any deviation will be more noticeable with vertical tile layouts.
- Create a flat surface – Fill any holes, dents, or uneven areas with appropriate patching compound and sand smooth.
- Apply appropriate substrate – For wet areas, cement backer board or waterproofing membrane is essential. For dry areas, properly primed drywall may be sufficient.
- Clean thoroughly – Remove all dust, debris, and contaminants that could prevent proper adhesion.

Proper wall preparation with level reference lines is crucial for successful vertical tile installation
Layout Planning
Thoughtful layout planning helps avoid awkward cuts and ensures a balanced, professional appearance:
- Find the center point of each wall and mark a vertical reference line.
- Dry lay tiles on the floor in your intended pattern to visualize the layout and determine where cuts will be needed.
- Adjust your starting point if necessary to avoid narrow slivers of tile at edges or corners.
- Mark additional reference lines to guide installation, especially for complex patterns.
- Plan for fixtures and obstacles by measuring and marking their locations before beginning.
Pro Tip: When planning a vertical tile layout, consider starting with a full tile at the bottom where it will be most visible, even if this means partial tiles at the ceiling where they’re less noticeable.
Common Installation Mistakes to Avoid
Technical Mistakes
- Inadequate support for heavy tiles – Vertical installations may require additional adhesive or mechanical support.
- Inconsistent spacing – Use tile spacers consistently for uniform grout lines.
- Improper cutting – Invest in quality tile cutting tools for clean edges.
- Insufficient adhesive coverage – Ensure 100% coverage for secure bonding.
Design Mistakes
- Ignoring the room’s proportions – Vertical tiles can make narrow rooms feel tighter.
- Competing with other strong patterns – Vertical layouts create bold statements that may clash with other patterns.
- Inconsistent application – Decide whether to carry the vertical pattern throughout connected spaces.
- Overlooking transitions – Plan how vertical tiles will meet other materials or surfaces.
Visual Inspiration: Successful Vertical Tile Applications
Sometimes seeing real-world examples is the best way to understand how vertical tile layouts can transform a space. Here are some inspiring applications across different room types and design styles.
Modern Bathroom Transformation

Floor-to-ceiling vertical tiles create a dramatic sense of height in this modern bathroom
This bathroom exemplifies how vertical tile layouts can completely transform a standard-height space. The continuous lines draw the eye upward, making the ceiling appear higher while adding architectural interest. The subtle color variation in these vertically laid rectangular tiles adds depth without overwhelming the clean, contemporary design.
Transitional Kitchen Backsplash

Vertical subway tiles create an unexpected focal point in this transitional kitchen
In this kitchen, vertical subway tiles create a fresh take on a classic material. The unexpected orientation adds visual interest while maintaining the timeless appeal of subway tile. The vertical layout is particularly effective behind the range, creating a natural focal point and visually expanding the space between countertops and upper cabinets.
Small Powder Room Enhancement

Vertical tile wainscoting makes this compact powder room feel significantly taller
Small powder rooms benefit tremendously from vertical tile layouts. In this example, vertically laid rectangular tiles create a wainscoting effect that draws the eye upward, making the modest space feel more generous. The partial wall application demonstrates that you don’t need floor-to-ceiling tile to achieve the height-enhancing benefits of vertical orientation.
| Space Type | Vertical Tile Application | Design Impact |
| Modern Bathroom | Floor-to-ceiling vertical subway tiles in shower and walls | Creates luxury spa feeling, makes standard-height ceilings feel more generous |
| Transitional Kitchen | Backsplash with vertical subway tiles behind range | Creates focal point, visually expands space between counters and cabinets |
| Small Powder Room | Partial wall vertical tile wainscoting | Makes compact space feel taller and more open without overwhelming |
| Narrow Hallway | One wall with vertical rectangular tiles | Counteracts tunnel effect, adds architectural interest to transitional space |
Cost Comparison: Vertical vs. Horizontal Installation
When budgeting for your tile project, it’s important to understand how tile orientation can impact overall costs beyond just the materials themselves.
| Cost Factor | Horizontal Layout | Vertical Layout | Difference |
| Material Cost | Base tile cost | Base tile cost | No difference for same tile |
| Material Waste | 5-10% typical waste | 10-15% typical waste | Vertical layouts often require more cuts, increasing waste |
| Labor (Professional Installation) | $5-10 per sq. ft. | $7-12 per sq. ft. | Vertical installations typically cost 15-25% more in labor |
| Installation Time | Standard timeframe | 15-30% longer | Vertical layouts require more precise alignment and cutting |
| Specialty Tools | Basic tile tools | May require additional leveling systems | Potential additional tool costs for DIY |
“While vertical tile installations typically cost 15-25% more than horizontal layouts due to increased labor and waste, many homeowners find the unique aesthetic and space-enhancing benefits well worth the additional investment.”
Budget Tip: If you love the look of vertical tiles but are concerned about costs, consider using vertical layouts as an accent feature in key areas (like behind a vanity or range) while using more economical horizontal layouts or other materials elsewhere.
Maintenance Considerations for Vertical Tile Layouts
The orientation of your tiles can affect long-term maintenance requirements, particularly when it comes to grout lines and cleaning.
Cleaning Challenges
Vertical tile layouts present some unique cleaning considerations:
- Gravity effects – Water and cleaning solutions run downward along vertical grout lines, potentially causing streaking
- Visible dirt – Vertical grout lines can show dirt and discoloration more prominently than horizontal ones
- Water spots – In shower applications, water spots may be more visible on vertical surfaces
To minimize these issues, consider using darker grout colors or applying a high-quality grout sealer immediately after installation and reapplying annually.
Maintenance Solutions
These practical steps can help maintain the beauty of vertical tile installations:
- Use a squeegee after showering to prevent water spots and mineral buildup
- Clean with microfiber cloths that won’t leave lint in vertical grout lines
- Apply grout sealer to prevent staining and moisture absorption
- Consider epoxy grout for high-moisture areas, as it’s more stain-resistant
- Use spray cleaners that cling to vertical surfaces rather than running down immediately

Regular maintenance helps preserve the beauty of vertical tile installations in wet areas
Decision Guide: Is a Vertical Tile Layout Right for Your Space?
With all the information provided, you may still be wondering if vertical tile orientation is the right choice for your specific project. This decision guide can help you evaluate your space and needs.
When should you choose vertical tile layouts?
Vertical tile layouts are ideal when:
- Your space has low ceilings that you want to visually heighten
- You’re looking to create a contemporary, unexpected design
- You have tall features (like a shower column or range hood) that would be complemented by vertical lines
- You want to make a small bathroom or powder room feel more spacious
- You’re designing a shower where improved water drainage is beneficial
- You want to create a focal point or accent wall with strong directional movement
When should you avoid vertical tile layouts?
Vertical tile layouts might not be ideal when:
- Your space is already very narrow and could feel tighter with vertical lines
- You’re working with a strict budget and need to minimize installation costs
- You prefer a more traditional, classic look
- Your DIY skills are limited, as vertical installations can be more challenging
- The space already has many competing patterns or strong vertical elements
- You’re concerned about the layout potentially looking dated in the future
Can you mix vertical and horizontal tile layouts in the same space?
Yes, mixing orientations can create dynamic, intentional designs when done thoughtfully. Consider these approaches:
- Use vertical tiles for accent walls and horizontal for remaining walls
- Install vertical tiles in the shower and horizontal tiles elsewhere in the bathroom
- Create a vertical tile feature behind a vanity or range with horizontal tiles in surrounding areas
- Use the same tile in different orientations to create subtle visual zones in open spaces
The key to successful mixing is maintaining consistency in tile type, color, and grout while varying only the orientation to create intentional contrast.
Conclusion: Making Your Final Decision
Choosing between vertically laid rectangular tiles and traditional horizontal layouts ultimately comes down to your specific space, design preferences, and practical considerations. Vertical tile arrangements offer a powerful tool for visually enhancing ceiling height, creating contemporary aesthetics, and adding unexpected visual interest to your spaces.
While vertical layouts may require additional installation expertise and slightly higher investment, the dramatic impact they can have on room perception often justifies these considerations. For many homeowners, the unique look and space-enhancing benefits of vertical tiles provide exactly the design solution they need, particularly in bathrooms, kitchens, and smaller spaces where maximizing visual dimensions is crucial.
Whether you choose vertical tiles for your entire space or as strategic accents, understanding the design principles, installation requirements, and maintenance considerations outlined in this guide will help ensure successful results that you’ll enjoy for years to come.
Ready to explore vertical tile options for your space?
Browse our collection of rectangular tiles perfect for vertical installations, or connect with our design team for personalized recommendations.

