If you’re searching for budget-friendly bathroom renovation ideas that you can easily do yourself, you’ve come to the right place. Whether your bathroom needs a simple refresh or a mini makeover, these DIY bathroom upgrades are affordable, effective, and perfect for homeowners who want to save money without sacrificing style. A well-designed bathroom not only improves your daily routine but can also increase the overall value of your home. The best part? You don’t have to spend thousands or hire expensive contractors to get that fresh, modern look.
Transform your bathroom with budget-friendly DIY renovations that make a big impact
1. Refresh Your Bathroom with a New Paint Job
One of the most popular and cost-effective ways to update a bathroom is by applying fresh bathroom paint. A new coat of paint can instantly transform the look and feel of your space, making it appear cleaner, brighter, and more modern. This simple DIY bathroom renovation project can be completed in a weekend and requires minimal tools and expertise.

A fresh coat of paint can completely transform your bathroom’s appearance
Best Paint Types for Bathroom Renovations
When selecting paint for your DIY bathroom remodel, it’s important to choose moisture-resistant formulas specifically designed for high-humidity areas. These specialized paints contain mildewcides and have a washable finish that stands up to splashes and frequent cleaning.
Recommended Paint Finishes:
- Semi-gloss: Highly moisture-resistant and easy to clean
- Satin: Less shiny than semi-gloss but still durable
- Eggshell: Subtle sheen that hides imperfections
Trending Bathroom Colors:
- Soft gray: Neutral and versatile
- Navy blue: Bold and sophisticated
- Sage green: Calming and nature-inspired
- Warm white: Clean and timeless
Pro Tip: Consider a two-tone paint scheme with a darker color on the bottom half of the wall and a lighter shade on top. This adds visual interest and can make small bathrooms appear larger. Use painter’s tape to create a clean, straight line between colors.
Don’t limit yourself to just the walls! With bathroom-safe paint, you can also refresh cabinetry, vanities, and even tiles. Cabinet painting kits are available for around $50-75 and can completely transform outdated wood cabinets. For tile painting, special epoxy-based formulas (approximately $25-40) can cover dated ceramic tiles without the mess and expense of replacement.
Peel-and-stick wallpaper is an increasingly popular choice for bathroom wall decor because it’s easy to install, removable, and available in waterproof, humidity-resistant designs. This DIY bathroom renovation option is perfect for renters or homeowners who want to experiment with bold patterns without the commitment of traditional wallpaper.

Create a stunning accent wall with peel-and-stick wallpaper for instant impact
Benefits of Peel-and-Stick Wallpaper for Bathrooms
Why Choose Peel-and-Stick:
- No messy adhesives or special tools required
- Easily removable without damaging walls
- Perfect for rental properties
- Can be installed in just a few hours
- Available in waterproof options for humid areas
Popular Wallpaper Patterns:
- Geometric shapes for modern appeal
- Floral designs for a soft, elegant look
- Subway tile patterns for a faux-tile effect
- Textured designs that mimic natural materials
- Bold prints that create a statement wall
Installation Tip: For best results in bathrooms, look for vinyl-based peel-and-stick wallpaper labeled as “waterproof” or “water-resistant.” Start application from the top of the wall and work your way down, smoothing out air bubbles as you go. Use a credit card or plastic smoothing tool for a bubble-free finish.
Peel-and-stick wallpaper costs between $25-60 per roll, depending on quality and design. Most small to medium bathrooms require 2-3 rolls. The entire project can be completed in 3-5 hours, making it perfect for a weekend DIY bathroom renovation.

Peel-and-stick wallpaper installation is straightforward with the right technique
3. Upgrade to a Water-Efficient Toilet
Replacing your old toilet with a low-flow or water-efficient toilet is a smart and practical upgrade. Modern toilets save water, improve flushing performance, and add a fresh, clean look to your bathroom. This DIY bathroom renovation project offers both aesthetic and functional benefits while being environmentally friendly.

Water-efficient toilets combine modern design with eco-friendly performance
Benefits of Installing a Water-Efficient Toilet
Environmental & Cost Benefits:
- WaterSense labeled toilets use at least 20% less water
- Save up to 13,000 gallons of water annually
- Reduce water bills by $140+ per year
- Improved flushing technology prevents clogs
- Modern designs are easier to clean
Popular Toilet Styles:
- Skirted toilets with concealed trapways
- One-piece designs for seamless cleaning
- Comfort height models (chair height)
- Dual-flush options for maximum water savings
- Round bowls for small bathrooms
Important: Before purchasing a new toilet, measure the “rough-in” distance from the wall to the center of the drain pipe (usually 12 inches). Also check if your existing toilet has a standard or elongated bowl to ensure proper fit in your space.
DIY Toilet Installation Steps
- Turn off the water supply and flush to empty the tank
- Disconnect the water supply line from the toilet
- Remove the old toilet by unscrewing the floor bolts
- Scrape off the old wax ring and clean the flange area
- Install a new wax ring on the toilet flange
- Set the new toilet in place and secure with bolts
- Connect the water supply and check for leaks
Water-efficient toilets typically cost between $100-300, with installation supplies adding another $25-50. This DIY bathroom renovation project takes approximately 2-3 hours to complete and requires basic plumbing tools.
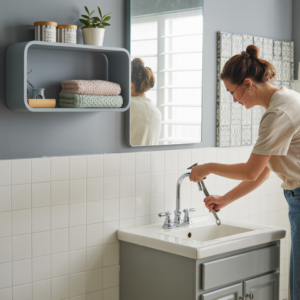
4. Replace Bathroom Fixtures for a Stylish Update
Updating your bathroom’s faucets, showerheads, and handles is one of the simplest ways to modernize the space without a full remodel. This affordable DIY bathroom renovation can dramatically change the look and feel of your bathroom while also improving functionality.

New fixtures can instantly modernize your bathroom’s appearance
Popular Fixture Finishes for 2025
Matte Black

Bold, contemporary look that creates dramatic contrast against light surfaces
Brushed Nickel

Versatile finish that hides water spots and fingerprints while complementing most color schemes
Polished Chrome

Timeless, mirror-like finish that brightens spaces and works with any style
Pro Tip: When replacing bathroom fixtures, take photos of your existing plumbing connections before removal. This will help you remember how everything fits together during installation. Also, turn off the water supply at the shutoff valves before starting work.
Compatibility Considerations
Before purchasing new fixtures for your DIY bathroom renovation, check these important compatibility factors:
- Sink faucets: Confirm if your sink needs a centerset (single unit) or widespread (separate handles) faucet
- Shower fixtures: Verify if your shower uses a pressure-balancing or thermostatic valve system
- Handle configuration: Count the number of holes in your sink or shower wall
- Water connections: Check if you have standard 1/2-inch connections
Bathroom fixtures range from $50-200 for faucets and $25-150 for showerheads. Installation typically takes 1-2 hours per fixture and requires basic plumbing tools. For a cohesive look, consider replacing all fixtures in the same finish.

A simple fixture update can dramatically transform your bathroom’s appearance
5. Refresh Bathroom Hardware to Boost Style
Small hardware upgrades like towel bars, cabinet pulls, and toilet paper holders can instantly improve your bathroom’s style and functionality. These inexpensive upgrades are great for budget bathroom remodeling and can be installed without professional help. This DIY bathroom renovation idea offers maximum impact with minimal effort.

Coordinated bathroom hardware creates a polished, designer look
Essential Bathroom Hardware Elements
Must-Have Hardware Items:
- Cabinet knobs and pulls
- Towel bars and rings
- Toilet paper holder
- Robe hooks
- Shower door handles
- Shelving brackets
Trending Hardware Styles:
- Mixed metals (combining 2-3 complementary finishes)
- Matte finishes for a modern look
- Geometric shapes for contemporary appeal
- Vintage-inspired designs for classic bathrooms
- Backplates for added visual interest
Design Tip: For a cohesive look, choose hardware that matches or complements your faucet and shower fixtures. Alternatively, try the trending mixed-metals approach by selecting hardware in a finish that contrasts with your fixtures (like matte black hardware with brushed gold fixtures).
Bathroom hardware is typically priced between $10-40 per piece, with complete sets available for $75-150. Installation is straightforward using basic tools like a screwdriver, drill, and level. Most hardware updates can be completed in 1-2 hours, making this an ideal weekend DIY bathroom renovation project.
Renter-Friendly Hardware Solutions
If you’re renting or don’t want to drill holes in your walls, consider these temporary hardware solutions:
- Command hooks and strips for towel holders and robe hooks
- Over-the-door towel bars that require no installation
- Freestanding toilet paper holders
- Tension rods for shower curtains
- Removable adhesive cabinet pulls
Final Thoughts on Budget-Friendly Bathroom Renovations
You don’t need a large budget or contractor to create a stunning bathroom. By focusing on smart DIY bathroom renovation projects, you can update your space with paint, wallpaper, fixtures, and hardware that fit your style and wallet. Start with one or combine several of these easy projects for an affordable bathroom remodel that adds both function and flair to your home.

Combine multiple budget-friendly updates for a complete bathroom transformation
Remember that DIY bathroom renovations don’t have to happen all at once. You can tackle these projects one weekend at a time, gradually transforming your space as your budget and schedule allow. Each small improvement contributes to a fresher, more functional bathroom that you’ll enjoy using every day.
“The best DIY bathroom renovations focus on high-impact changes that maximize visual transformation while minimizing cost and effort.”
We’d love to see your DIY bathroom renovation results! Share your before and after photos on social media with the hashtag #DIYBathroomReno or comment below with your own budget-friendly bathroom transformation tips.

